Sunday, December 25, 2016

Merry Christmas

Just popping in with a short post to wish all a Merry Christmas and to share a few of the cards I made.


These were supper quick and flat for mailing.  I used Tim Holtz mini globe and bird dies.  The sentiments are also dies.  I placed one on a strip of white cardstock edged with a Martha Stewart snowflake punch and the other one was on a strip of white cardstock using a Tim Holtz embossing folder.


This card was made using Maja Design papers and a Tim Holtz large snowflake die with matching embossing folder.  Wooden snowflakes are from Recollections.


I did manage to squeeze in a few more cards before today but not as many as I had hoped to get done.  I really need to start Christmas cardmaking much sooner!

For those who celebrate, have a wonderful Christmas Day and enjoy the week ahead!  Thank you so much for stopping by and for your kind comments.

Sunday, December 18, 2016

Altered Wooden Spool Christmas Decoration

Hi everyone!  One week to go until Christmas and I am so far behind!  Just popping in to share an altered wooden spool I made for a Christmas swap.

First, I gave the spool a coat of gesso.  A crochet doily was placed over the tart tin.  I then glued the spool to the tin and the tree to the top of the spool.  Using various laces, trims, flowers and embellishments, I decorated from top to bottom.  Lots of photos are here to see the details.

                                                                             Front

Back

                                                           Next photos are side views


After everything was glued in place, I added some gesso and Glamour Dust to give it some extra sparkle.  If you click on each photo, you can see the details better.

That's it for me today.  We just got back from our annual brunch with family.  I have lots to try to attempt to complete today!  Thank you so much for taking the time to stop by especially during this busy time of year.  I appreciate all your kind comments.  Have a wonderful week ahead!

Sunday, December 11, 2016

My Besties Christmas Cards

Hi everyone!  I hope all is well.  We took our annual trip to Cape May, New Jersey, this past week for their Victorian Christmas.  All the old Victorian homes are beautifully decorated.  It is such a perfect quaint town.

Today, I have two cards to share using a My Besties stamp in two different color palettes.  First up is a card with traditional Christmas colors.  The sweet image is colored with Copics.


The papers, border strip and rosette are from an older K&Co line once again.  The flowers and leaves are a mix of Prima and my stash.  Stickles were added to the fur trim on the girl's outfit.  Liquid Pearls were used to simulate snowflakes.


For my next card, I decided to go with a pink, teal and gold color palette.  The pattern paper is from Bo Bunny's Candy Cane Lane, adhered to gold foil paper and then attached to a white cardstock base.  The image was cut using a Tim Holtz stitched oval die, edge inked with Inka Gold and mounted to the card with foam dots.  The gold bow is Maggie Holmes for Crate Paper.  The flowers are a combination of Recollections, Spare Parts and my stash.


This card is nice for a winter theme as well.  I love these soft colors, too.


Well, this is only the beginning of my Christmas card making.  I've only completed one other card, so you know the remaining days will be spent by me in a frenzy trying to get enough cards made!  But, I do enjoy the process (not the stress!).  Thank you so much for stopping by.  I appreciate each and every comment you leave.  Have a wonderful week ahead!

Sunday, December 4, 2016

Altered Canvas and Tag

Hi everyone!  December has arrived and now the rush is on for me to finish projects in time for Christmas.  Why don't I ever learn and start earlier?  Oh well, I did make a reverse altered canvas for a swap with a Christmas/Winter theme that I am sharing with you today.


I loved making this project.  I started by giving both the front and back of the canvas a coat of gesso.  I then used a Tim Holtz snowflake stencil and Golden's Pearl Mica Flake paste on the back and sides (which I forgot to photograph).  A Pion image and Maja Design paper were placed inside the opening after distressing and inking.  Various lace trims and beads were added around the frame.  A little tree from Joann's and pieces of a winter floral pick were placed along the inside edge.  A few bells were added to the cluster.  A couple Recollections wooden snowflakes were glue to the background.  To finish it off, I added a layered chipboard snowflake from Recollections to the upper left corner and then the wooden Peace ornament to the lower right corner.  I made the angel from a mold and attached him to the wooden ornament along with a couple of rhinestones.


In this photograph above, you can see a little bit of the snowflakes that I stenciled and the decorative lace trim placed around the inside of the frame.

While I had the Maja Design papers out, I also made a small tag that came together very quickly.  I cut the tag from the papers and layered it onto a kraft tag.  Cheesecloth was placed under the tag and a piece of trim from Prima at the bottom.  A couple of Recollections snowflakes, rhinestones and a hemp tie completed the tag.


I am entering the canvas in the Winter Magic challenge at A Vintage Journey and also the Home for the Holidays challenge at Frilly and Funkie.

Thank you so much for taking the time to stop by.  I appreciate each of your comments.  Have a wonderful week ahead!

Sunday, November 27, 2016

Lacy Tag

Hi everyone.  The Thanksgiving holiday weekend here in the States has come to an end.  We had a very enjoyable, if tiring, four days.  We did get the outside of our home decorated.  Now, to work on the inside.

Today, I have a tag to share using lace and an older line of paper from K&Co.  I cannot believe how much mileage I am getting out of that paper pad!


The tag base was made from a cereal box and covered in the pattern papers.  All edges were inked and distressed.  Ruffled lace was glued around the tag and then accented with a string of pearls.  A lacy butterfly applique was placed on top of the papers.  A couple of tiny images from the paper pad were tucked into the flower cluster.  The vintage buttons are from my stash.  Tea-stained ribbon was used for the bow and hanger.


If you click on each image, you can see the details a bit better.

Thank you so much for taking the time to stop by.  I appreciate each of the kind comments you leave.  Wishing all a wonderful week ahead!

Sunday, November 20, 2016

Crazy Cat Card

Hi everyone!  Just popping in quickly to share a little card I made for the Fall using those sweet crazy cats stamps by Tim Holtz.  It was super quick to make.


I began by using a black cardstock base layered with pattern paper and two strips of orange glittered tape.  The cat was colored with Distress Inks and cut out with a coordinating die.  The circular shapes are two punches by Paper Shapers.  I colored the white shape with Distress Inks and then adhered the cat to it.  Festive colored fall leaves were placed around the circular shape and attached to the card.  Gold glittered stickers from Making Memories form the word "Wish."

I thought I'd better post this card now before my Christmas/Winter projects take over.  This week, we celebrate the Thanksgiving holiday here in the States, so I thought this card would be appropriate to share now.  I wish each and everyone of you all the best, and I am very thankful for the many friends I've made through the hobby of crafting.

Thank you so much for taking the time to visit my blog.  I appreciate the kind comments you leave.  Have a wonderful week and "Happy Thanksgiving" to all in the USA.

Sunday, November 13, 2016

Lacy-edged Tag

Hi there!  I hope this weekend find you well.  It's a pretty, crisp fall day here today.  Love the fresh air!  Can you believe that November is just about half over?

Today, I have a tag that I made using a decorative edge Spellbinders' die for the base.  I first cut the shape from a cereal box and then covered it with K&Co papers.  It was a little messy gluing the papers onto the decorative edge, but I think it turned out nicely.


The vintage photo was trimmed with ruffled lace and pearls.  I also added ruffled lace to the bottom of the tag.  A lace bow was tied off to the side of the tag.  Various flowers, hemp bows, resin birds,  Prima pearl swirls and diecut leaves finish the tag.


I actually have begun working on some winter/Christmas projects which I'll share later.  It's my favorite time of the year!

Thank you so much for taking time to visit my blog.  I appreciate your kind comments.  Have a wonderful week ahead!

Sunday, November 6, 2016

A Besties Card

Hi everyone!  It's November already and the days seem to be flying by!  I really need to get my mind set on making Christmas cards or I will be caught at the last minute without enough of them.

In the meantime, I have a card to share using a My Besties stamp that I've used before.  This time, I went with a totally different color palette.


The color scheme I used was pink, blue and brown.  I began with a brown cardstock base, a layer of white cardstock and then the pattern paper.  A strip of pretty pink lace trim was added next.  The Bestie image was colored with Copics and then framed with a Spellbinders' die.  Everything else is from my stash.


I love My Besties stamps.  I have some unused ones and need to play around with them more often.

Thank you so much for taking the time to stop by.  I appreciate your kind comments.  Wishing everyone a wonderful week ahead!

Sunday, October 30, 2016

Sing Tag

Hi there!  After having a covering of frost on the ground a couple of days ago, today's temperature will be 80 degrees.  No wonder plant life is confused.  One of my trees was trimmed back a month ago leaving very little leaves on it.  In that short space of time, there has been new leaf growth plus flowers blooming on it.  The seasons anymore are very confused; yet, many argue there is no global warming.

Today, I have another tag to share as I seem to make these more than anything else!  I made this tag for a swap.  The base is from a cereal box and covered with K&Co papers (I can't believe how much mileage I'm getting out of this paper pad).  All edges were inked and distressed.  Pretty lace trim was glued across the bottom.  Then the layering began.  I used a doily diecut by Tim Holtz.  The resin frame is Prima.  A pair of resin birds was added to the center of the frame.  I'm not sure who made the resin flowers near the bottom.  An assortment of Recollections flowers are grouped around the frame and accented with feathers, stickpins, twine bows, and wood leaf shapes.  Flat-back pearls were glued around the word tile by Bead Landing.   Stickle touches were added here and there.  A piece of lace was tied to the top and adorned with a beautiful pearl embellishment.


I was pleased with how this tag turned out, and the recipient was quite happy with it.  It was a lot of fun to make.


Thank you so much for taking time to stop by and also for the sweet comments you leave.  I hope the week ahead is a good one for all!

Sunday, October 23, 2016

Fairy Tale Tag

After some very unseasonably warm weather this past week, we finally have a return back to Fall.  I am loving the crisp, cool weather.  On my agenda today is making a nice big pot of homemade chicken noodle soup with fresh, warm bread.

My post this week features a tag I made awhile back.  Everything used are older items from my stash, so I'm not sure where they came from.  I do know that the flowers are a combination of Prima, Recollections and Spare Parts.  I began by covering a tag made from a cereal box with K&Co papers.  A doily was placed next with the fairy tale like image on top.  I surrounded that with some trim and a string of pearls.  A piece of lace was glued to the bottom on the tag.  Next, all the various flowers were placed around the image.  A hemp bow, ruffled lace, Prima diecut leaves and a pearl were tucked among the flowers.  A piece of lace trim was tied to the top.


I did have another piece of lace attached across the bottom of the tag but didn't like how it looked.


Well, that's it for me today.  I guess it's time to put the summer clothes away and bring out the fall ones.  At least, I'm hoping summer is finished making an appearance this season!  Thank you so much for your kind comments and for taking the time to stop by.  Wishing all a wonderful week ahead!

Sunday, October 16, 2016

Halloween Cards

Hi everyone!  Let me begin by saying I am not really a fan of Halloween.  However, I do have occasions when I need a card in that theme.  A co-worker of mine loves Halloween and anything related to it year round.  Her birthday was in July and this is the card I made for it.


Mostly everything used on this card has been in my stash for quite awhile.  I'm not sure where the pattern paper came from as it was just a scrap I had left.  I simply layered in onto white cardstock and then onto the black card base.  The flowers are Prima that have been spritzed with various Glimmer Mists.  The skeleton sticker is from Jolee.  I then made a bow with stripe ribbon and twine and accented it with a Recollections rhinestone.  The sentiment is from Papertrey Ink.

Next up is a card featuring a My Besties stamped image called Cats Meow.  I colored it with Copic markers and highlighted with Stickles.  The pumpkin brad on her shirt is from Queen & Co.  I used a Tim Holtz Stitched Oval die to frame the image.  Again, the pattern paper was a scrap from my stash that I adhered to a black cardstock base.  The decorative Steampunk Corners are from Cheery Lynn Designs.


Well, that's it for me today.  I hope you are enjoying your Sunday.  Thank you so much for stopping by and the sweet comments you leave.  Wishing you a wonderful week ahead!

Sunday, October 9, 2016

Decorative Edge Tag

Hi everyone!  It's a rainy Sunday here with a bit of rain from what's left of Hurricane Matthew.  Nothing like what the southern coastal states experienced, though.  We should have clearing by late this afternoon.

Today, I have a tag to share that I used a Spellbinders die to create the base.  I first cut it from a cereal box and then cut the pattern paper to cover both sides.  The paper is K&Co.  From that point, I just began layering.  A lace bow was tied around the left side of the tag.  I used some ruffled lace for the bottom of the tag.  The sweet image was also edged with lace.  Various flowers from my stash were then arranged to accent the image.  A few Prima diecut leaves and a couple of hemp bows were tucked around the flower cluster.  Flat-back pearls edge the dream word tile by Bead Landing.


This tag was so much fun to make and came together very quickly.  I made another one at the same time which I'll share later.


That's it for me today.  I hope the week ahead is a good one for all especially anyone who had to deal with Hurricane Matthew.  Thank you so much for stopping by.  I appreciate all your kind comments.

Sunday, October 2, 2016

Card Featuring Lissy Bee Stamp

Hi everyone!  Just a quick post today sharing a card using a sweet stamp by Lissy Bee Stamps that was given to me by a dear friend.  I decided to use if for a birthday card.


The image was colored with Copic markers and highlighted with Stickles.  I used a Spellbinders die to frame the image.  The blue flower in the lower corner is a layered die by Little B and also highlighted with Stickles.  The sentiment is a PTI stamp.  The rest of the card was made with scraps from my stash.

It's been a rainy couple of days here, but I don't mind.  There is something peaceful about rainy days.  I did whip up three tags on Friday once again trying to use up things in my stash.  Why doesn't it look like I put a dent into it?

Thank you so much for stopping by!  I appreciate your kind comments.  I hope the upcoming week is wonderful for everyone!

Sunday, September 25, 2016

Shabby Chic Altered Paintbrush

Hi friends.  Last week, I mentioned I was altering a paintbrush in a shabby chic style for a swap.  This was my first attempt at one.  Here it is.


First, I began by sanding the handle and giving it a coat of white gesso.  Once that dried, I gave the handle a coat of Antique Linen paint by Martha Stewart.  I glued various appliques around the handle and several lace trims around the brush part.  A Prima butterfly was placed at the top.  Seam binding bows were attached to the sides of the brush.  A Recollections metal embellishment was placed on top of the lace.  All the tiny flowers are also from Recollections.  I highlighted them with Diamond Stickles.


This is the back of the paintbrush.  A seam binding bow was attached to the top for hanging.  I tied a hemp bow to a metal "Made with Love" charm and attached it to the back to finish it off.


If you click on each photo, you can see the details better.  I apologize for the poor lighting in the photos.  I needed to get it in the mail that day so there was no time to wait for better lighting.

All in all, this was very easy to do.  The hardest part was removing the glue from my fingers!  lol

It is a beautiful day here today.  You can definitely feel that touch of fall in the air, and I am so happy about that!  Thank you so much for taking the time to visit my blog.  I appreciate all your sweet and kind comments.  Have a wonderful week ahead!

Sunday, September 18, 2016

Shabby Chic Aqua Tag

Hi everyone!  Another week has gone by--time is really passing quickly.  I was on a roll this week making two cards and two tags.  My next project is altering a paintbrush--a first for me.  We'll see how that goes.  What are you creating?

Today, I have another tag to share.  This tag came together so easily.  My tag shape was cut from a cereal box and covered with an older line of K&Co paper, distressing and inking the edges.  Then the fun began.  The appliques and trims as well as the white fabric flower were given to me by a dear friend.  The sweet image is showcased in a resin Recollections frame.  The flowers, butterfly and gems are also Recollections.  The white delicate leaves were made with a Prima die.


My most favorite crafty item are tags, especially vintage and shabby chic ones.  Love making and swapping them with friends.


I love the cream and white tones paired with the aqua.  There is something soothing about them.  If you click on each photo, you can see the details better.

Well, that's it for me today.  I need to get dinner started and then get ready for work tomorrow.  Have a wonderful Sunday and week ahead.  Thank you so much for stopping by and for leaving such sweet comments.  I appreciate each and every one!

Sunday, September 11, 2016

A Couple of Cards

Hi friends!  I thought I would take a break from featuring another tag and post a couple of cards I recently made.

First up is a card I made for my Dad's birthday.  When making masculine cards, I frequently turn to Tim Holtz products which is what I did here.   A dear friend gave me the set of crazy cat stamps for my birthday so I just had to made a card.  I bought the matching crazy cat dies which are much easier to use than having to fussy cut.  The cat was colored with Copics.  For the background, I cut a piece of paper from Tim's Wallflower collection and placed in onto a light brown card base.  I did fussy cut the flowers and leaves on the lower right side.  All cut outs were attached with foam dots.  I stamped the sentiment onto a stamped label, cut is out, and accented it with a hemp bow.  The Dad stickers are from Making Memories.


I really am a dog person, but I find these crazy cat stamps so adorable!  Looking forward to making more things with them.


Next up is a quick feminine card.  The papers are from Pion Design Vintage Garden collection and attached to a deep pink card base.  A simple seam binding bow was wrapped around the paper and accented with a rose, twine and a tiny Pion envelope.  Pink pearls add a finishing touch.


I simply love Pion Design papers and never tire of using them.


Well, that's it for me today.  I have been making quite a few tags lately and will share soon.  What I need to do is to start making Christmas cards/tags now so I don't fall behind as the holiday nears.  Thank you so much for stopping by and for your sweet comments.  I wish each of you a wonderful week ahead!

Sunday, September 4, 2016

Megan Doll Tag

Hi friends!  I hope you have been well and are enjoying the weekend.  Those of us in the States have a holiday tomorrow and I appreciate that extra day off from work.

As I mentioned last week, I spent over six hours working on a doll tag that was inspired by a recent 
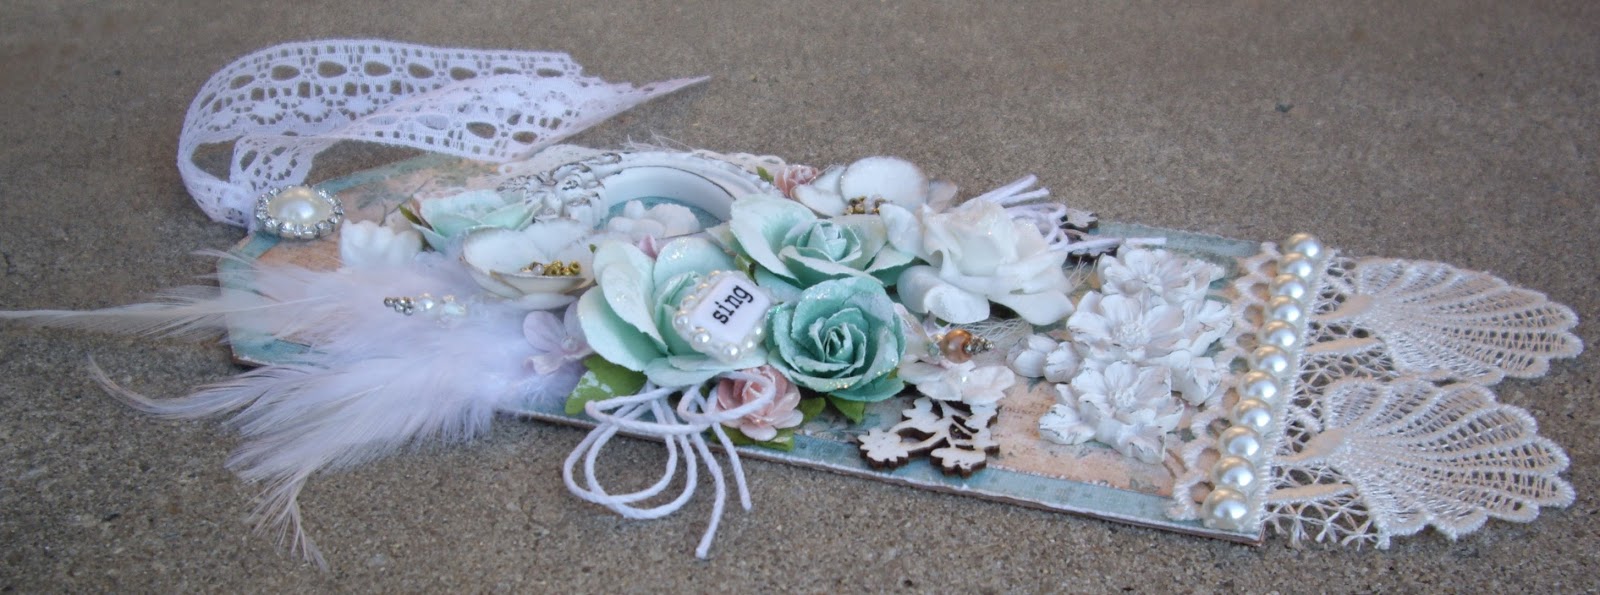
post by Pamellia Johnson.  She made an absolutely beautiful card featuring a Julie Nutting doll stamp.  I loved it so much that I thought I would try to re-create something similar in tag form for myself.   (I hope you don't mind, Pamellia, that I lifted the idea from you.)  Pamellia's work is much more detailed and just perfect.  She makes it look so easy in her videos; but having tried it myself, I know just how much time goes into it.  So, here is my version.


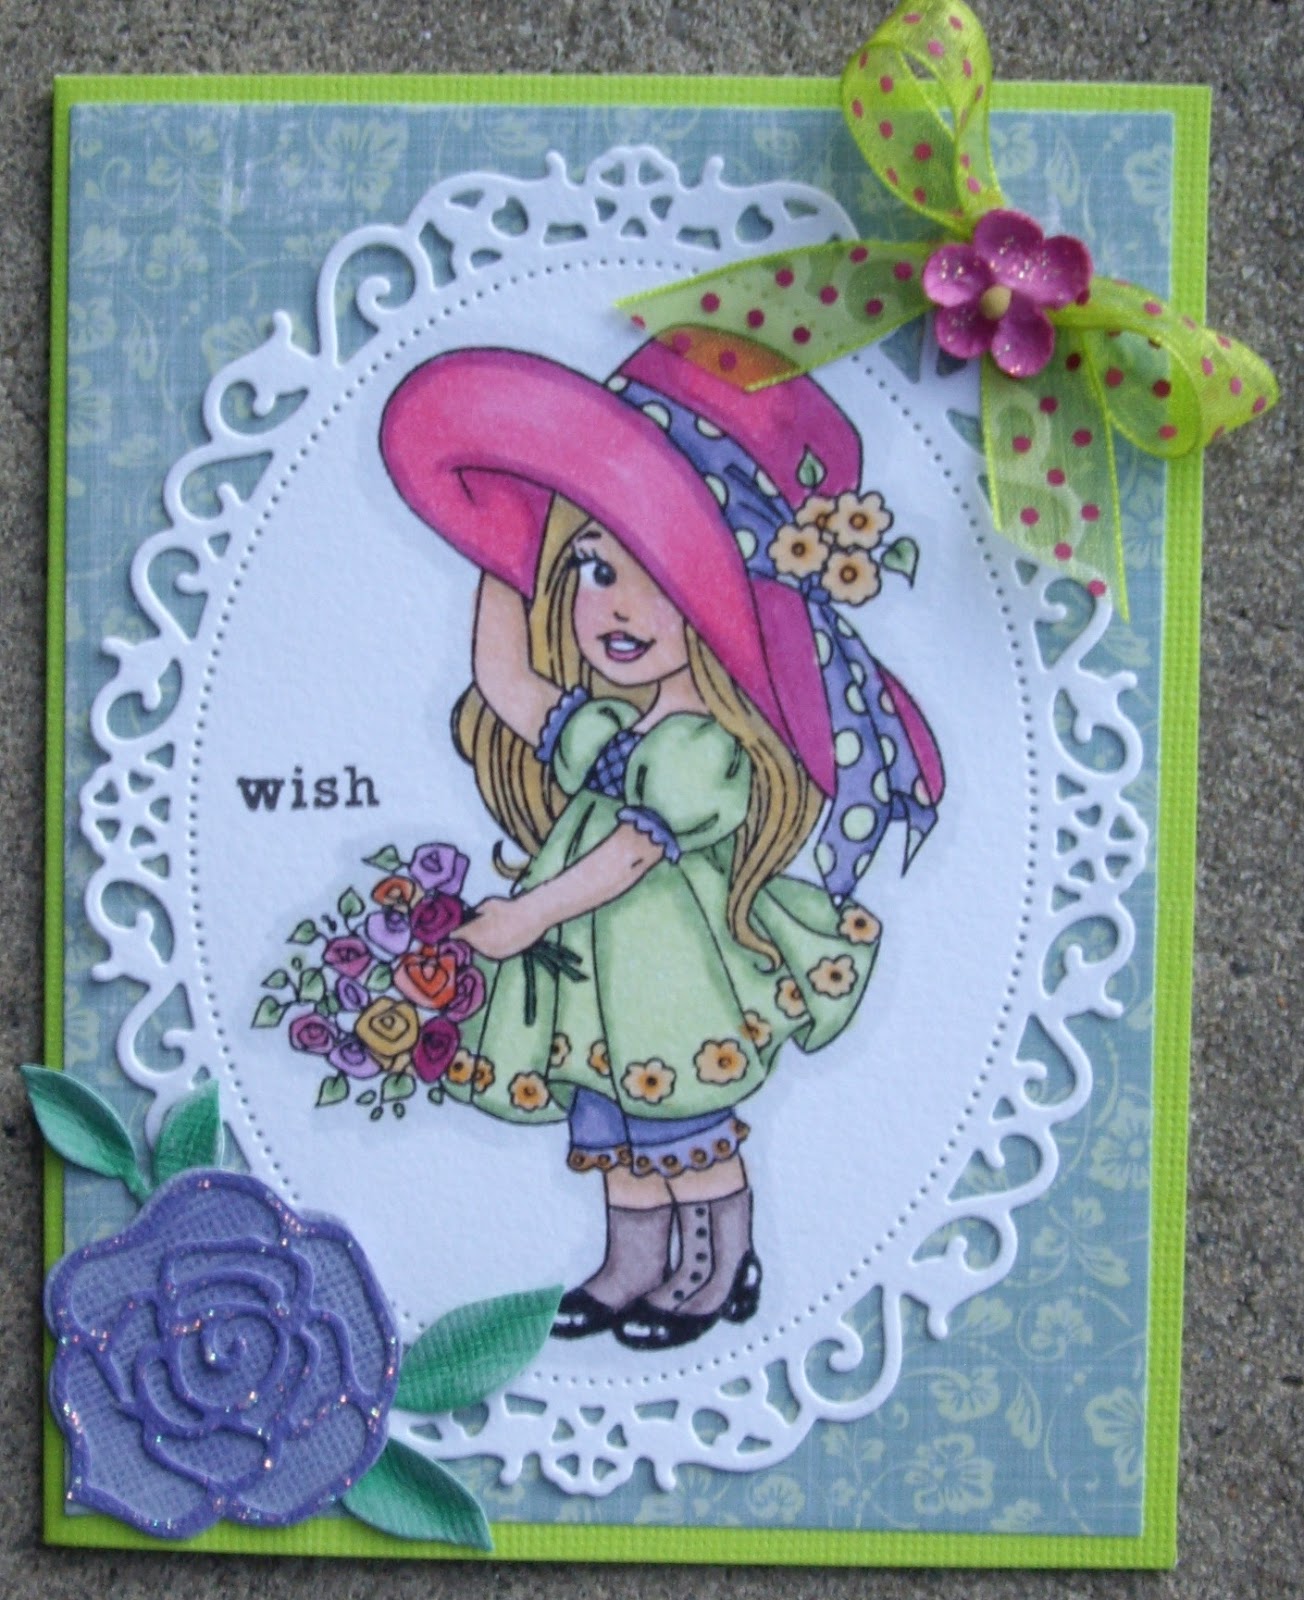
First, I stamped the Megan doll stamp onto cardstock, fussy cut it, paper pieced the dress and boots with papers from Prima's Butterfly collection (adding layers with foam tape), and colored the hair with colored pencils.  I added a bit of lace trim under the skirt edge.  A seam binding bow was tied to the waist.  A Prima doll necklace adds a touch of elegance.  Using a Prima watercolor tag, I layered, inked and distressed more papers from the Butterfly collection.  I then added a Prima doily and some Cheery Lynn diecut swirls.  The flowers are a mix of Prima, Recollections, and Spare Parts.  The two flowers at the bottom have tiny Prima resin flowers for the centers.  Some Prima flat back pearls were placed at the top.  I added some gesso to the flowers to tone down the colors.  Lastly, I tied a piece of lace to the top of the tag.


Foam tape was placed under all the layers as well as the doll for added dimension.  Here is a view from the other side.


Well, there you have it.  Quite a lot of work but I was pleased with the final result (although at one point, I was ready to toss it).  If you have a chance, check the link above to Pamellia's blog to view her gorgeous card and a detailed video.

Thank you so much for stopping by and your sweet comments.  I wish you all a wonderful week ahead.  My plans for the holiday tomorrow are to start my fall housecleaning!

Sunday, August 28, 2016

On Wings of Love Tag

Hi friends!  August is fast coming to a close and I, for one, am looking forward to the Fall Season and all it brings.

My tag today is made with bits and pieces from my stash.  The papers are all K&Co.  The lace is from Joann's.  A bit of ruffled lace was used to frame the Craft Secrets image.  A crochet doily was cut in two for added layers.  The ruffled trim as well as the beaded trim and the metal embellishment were a gift from a dear friend.  The flowers and butterfly are Recollections.  The rhinestone swirl is Prima.


The paper edges were all inked and distressed.  I used foam tape for dimension between the layers.  A resin rose was placed on top of the metal embellishment.


So, what have you been up to this weekend?  I have spent over six hours in the course of three days working on a tag featuring a Julie Nutting doll stamp.  I was inspired by a beautiful card posted the other day by Pamellia Johnson.  Let me say, she makes it look so easy; but I can now say that I know firsthand the amount of work she puts into her gorgeous projects.  I am still not finished with the tag and it does not look as beautiful as her card, but I am trying!  Hopefully, I will be able to share it in the future if I'm not too embarrassed by it!  lol

Have a wonderful week ahead, dear friends.  Thanks so much for taking the time to stop by.  I appreciate all your sweet comments.

Sunday, August 21, 2016

August Tag

Hello dear friends!  I hope all is well with you.  We are due for a storm front to pass through later today bringing a welcome relief from the heat and humidity.

Today, I have a tag featuring journaling tags from Graphic 45 Time to Flourish collection.  I thought it would be nice to showcase the one journaling card since it is August.  The tag came together very quickly using an assortment of items from my stash.  I simply covered the tag in paper from Teresa Collins and tucked some cheesecloth under the journaling card.   Pieces of trim were added at the bottom of the tag.   The flowers are a mix of Prima and Recollections.  The butterfly is from Martha Stewart.  Rhinestones are Recollections.  The round pearl cluster on the tiny tag is from Prima.  I attached a flower charm to the cord tie at the top.


I thought the colors were a nice match for this summer theme tag.  Everything fell into place so easily.


Thank you so much for taking the time to stop by.  I always appreciate the sweet comments that are left.  Have a wonderful week ahead.

Sunday, August 14, 2016

Wish Card

Hi everyone!  Another week has passed and has been a bit stressful for me.  I'm not going to dwell on it as it certainly doesn't help.  We are also in the midst of a terrible heat wave, although not as intense as other areas of the country.  Thank goodness fall is not too far away!

Today, I have a very quick card to share with you.  I was short on time and needed a birthday card.  Here is the finished result.


Can't get any easier than this.  I began with a yellow cardstock base.  The diecut background is from Tim Holtz. Most everything else is from Michael's.  I simply layered the flowers, tucked in a twine bow, and attached the butterfly.  The jeweled wish stickers are from Making Memories.  The little star gem in the lower right corner is also from Michael's.


Just a short, quick post today.  I hope you are having a good weekend and wish you a wonderful week ahead.  Thanks so much for stopping by and your sweet comments!

Sunday, August 7, 2016

By the Sea Tag

Hi there, friends.  I hope you are well.  This past week had its ups and downs.  My son moved into his first apartment, so we have an empty nest now.  Not sure how I feel about it yet, but I know it was bound to happen sometime.  On the up side, my birthday was last week as well.  It has stretched on for a week!  I received some beautiful handmade items and cards and other wonderful gifts which I appreciate so much.

Today, I am sharing a tag I made using the beautiful papers from Pion Design--Shoreline Treasures.


For the base, I cut a tag shape from a cereal box and covered both sides with the paper, inking the edges.  A bit of trim was added to the bottom.  Using Tim Holtz' chicken wire die, I cut the shapes from brown cardstock and tucked them beneath the vintage photo.  Isn't that child so sweet?!!  I placed various flowers from my stash around the photo with some seashells from Michaels.  A couple of Prima diecut leaves and some hemp bows were also tucked under the flowers.  The "By the Sea" sentiment was cut from a border strip and placed on a flower. The word "moments" is also a diecut by Tim Holtz.  Butterflies were fussy cut from the papers and added to the top.  Tea-stained seam binding finishes it off.


I am pleased with how this tag turned out.  Although it was difficult to part with, I sent it to a dear friend to thank her for her kindness.  I hope she will like it.

It's a beautiful day here today with a break in the humidity.  I plan to take some time to enjoy it.  Thank you so much for stopping by.  I appreciate the sweet comments you leave.  Have a wonderful week ahead!